
You can use Surveypal surveys to gather feedback from Zendesk Talk tickets. The process sends an SMS to the customer with a short link which opens the survey to their mobile phone browser.
This integration requires your Surveypal account to have SMS sending enabled. Please contact Surveypal helpdesk at helpdesk@surveypal.com if you are interested in using SMS to collect feedback.
Set default SMS invitation message
- Open your survey and go to Distribute-view, then select "Email invitations"
- Remove the default message entirely (you can ignore To, From, Reply-to, Subject and Sender profile)
- Set SMS message to body field. Remember that Surveypal will add a short link to the message that is 22 characters long so your message length can be only 138 characters. If the total message exceeds 160 characters, you will be billed for multiple messages.
- Once the message is ready click "Save message" and then click "Cancel" to exit the view.
NB!
- If you send SMS invitations to United States you must add your company name to the message. It's not possible to use alphanumeric sender name to mask the sending number in SMS messages sent to US numbers.
- Sending messages in United States and United Kingdom requires you to provide additional information about the purpose of sending them. Surveypal will forward the needed information to their SMS provider for registering the information with local carriers. Please contact helpdesk@surveypal.com for more information.
Create webhook in Zendesk
Create a new webhook in Zendesk.
1. Click Admin (gear icon) from left menu
2. Click "Overview" under "ADMIN HOME" title
3. Click link "Go to Admin Center"
In Admin Center
1. Click "Apps and integrations"
2. Click "Webhooks" under "Webhooks" title
3. Click "Actions" in top right corner and select "Create webhook"
First you need to add webhook details and second step is set up event subscription.
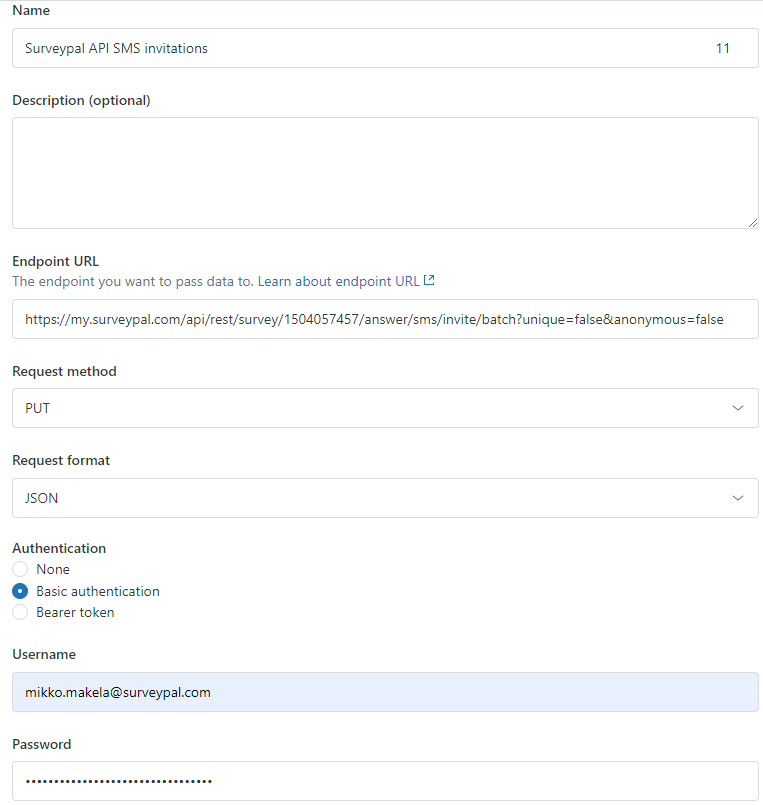
Webhook details
Name
Add descriptive name so that you know later what this webhook does.
Endpoint URL
Example: https://my.surveypal.com/api/rest/survey/<add your survey ID here>/answer/sms/invite/batch?unique=false&anonymous=false
Survey ID
You can copy survey ID from the survey list in Surveypal when you select your survey and scroll down the survey information view
Parameter anonymous
If you want that respondent is anonymous (number is hidden in Surveypal) then add value "true" instead of "false".
Request method
Select PUT
Request format
Select JSON
Authentication
Select Basic authentication.
Username
Username is your Surveypal username (email address)
Password
Password is combination of text "token-" and your API key.
To create an API key
- select your name from the bottom left corner on the Surveypal front page
- select 'Your account'
- select tab 'API keys'
- Click 'Create key'
- Give your API key a name and click 'Create'
When you have API key, you can generate Basic Auth password so that you combine text "token" and your API key.
For example if API key is
"AA_HvXX0A1Y1X11113ZV3v11cXX"
then Basic Auth password is
"token-AA_HvXX0A1Y1X11113ZV3v11cXX"
Here is an example of webhook details:
When all details are in place then you can click "Create"
Now you are ready for step two "Set up events subscription".
Click link "Open Support Admin area in a new window" and leave Zendesk Admin Center tab open.
Set up events subscription
Create a new trigger which will call your new HTTP target when ticket status is changed to solved.
NB! Pay attention to the order of your triggers in Zendesk, since they are run from top to bottom. Some prior trigger may hinder your feedback trigger from running.
- Click "Triggers" under "Business rules" title
- Click "Add trigger"
- Give the trigger a clear name e.g. Surveypal CSAT and
- Add conditions for testing :
- Status - Changed to - Solved.
- Ticket: Tags - Contains at least one of the following - sms_test
- If testing was successful, set the actual trigger rules; here's what we recommend
- ALL: Status - Changed to - Solved
- ALL: Ticket: Tags - Contains none of the following - survey_sent (+ any additional tags you may use)
- ANY: Channel - is - Phone call: Incoming
- ANY: Channel - is - Phone call: Outgoing
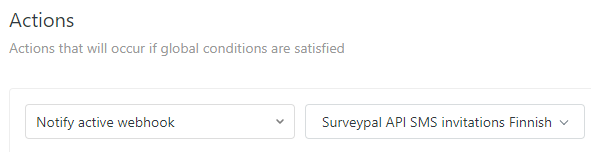
- ACTION: "Notify active webhook" and then select your new webhook name from next dropdown.
- Add below JSON to your action "JSON body" field
- ACTION: Add tags - survey_sent
[
{
"phoneNumber":"{{ticket.requester.phone}}",
"meta":[{"key":"ZendeskTicketId","value":"{{ticket.id}}"},{"key":"RequesterPhone","value":"{{ticket.requester.phone}}"},{"key":"ZendeskAgentEmail","value":"{{ticket.assignee.email}}"},{"key":"ZendeskAgent","value":"{{ticket.assignee.name}}"},{"key":"ZendeskFirstName","value":"{{ticket.requester.first_name}}"}]
}
]
This JSON picks ticket requester phone number and other information from the ticket and adds them as background information to the Surveypal survey response.
Here is an example of the notify active webhook action:

Save your trigger.
Go back to "Zendesk Admin Center" tab and click "Complete setup".
Test your integration
Call to your support number, set the test tag to the ticket and solve it. You should receive an SMS message containing a short survey link.
Multilingual surveys
If you have more than one language in your survey then you need one trigger/automation per language and also one webhook per language.
First follow above steps and create one trigger/automation and one webhook. Then you can add rest of the languages.
Add locale id to your webhook URL
You have to add language id (locale id) to your webhook.
How to find language id:
1. Open your survey in Surveypal
2. Go to Build view
3. Click language menu (next to Settings) and select "Edit languages..."
4. Right click one language name from left side list and select "Inspect"
5. You can see that every language is has a div element which class is "item". Every of these items have "id" parameter and parameter value is language locale id. Copy id value.
Add locale id to your webhook endpoint URL:
1. Click Admin (gear icon) from left menu
2. Click "Overview" under "ADMIN HOME" title
3. Click link "Go to Admin Center"
In Admin Center
1. Click "Apps and integrations"
2. Click "Webhooks" under "Webhooks" title
3. Hover over your webhook name and click three dots in right side of the screen and select "Edit"
4. Add &localeId=YOURLOCALEID to end of Endpoint URL field and replace YOURLOCALEID with the value what you copied from the survey.
For example:
https://my.surveypal.com/api/rest/survey/1504057457/answer/sms/invite/batch?unique=false&anonymous=false&localeId=112B1553-6B11-4995-9EAE-3BECBA33A738
Change webhook name so that it match your locale ID.
Click "Update" button.
You need one webhook per language so copy everything from your current webhook and create a new webhook. Change only name and localeId in Endpoint URL field.
Edit your current trigger/automation conditions
You have to create one trigger/automation per language.
First edit your current trigger/automation. Add there new conditions which checks phone number country code from ticket subject text. Below example we check if subject contains Finnish country code.

Check that your trigger/automation Action have correct Notify active webhook name:
Save your trigger/automation after this.
Next duplicate your trigger/automation.
1. Hover over your trigger/automation, click three dots and select Clone.
2. Change the name so it match your second survey language.
3. Change condition "Subject text - Contains the following string -" to match your second language country code.
4. Change Notify active webhook and select your second language webhook name from dropdown.
You don't need to edit target JSON body.
Save your trigger/automation.
Troubleshooting
If your integration doesn't work then check API error messages from Zendesk.
1. Click Admin (gear icon) from left menu
2. Click "Overview" under "ADMIN HOME" title
3. Click link "Go to Admin Center"
In Admin Center
1. Click "Apps and integrations"
2. Click "Webhooks" under "Webhooks" title
3. Hover over your webhook name and click three dots in right side of the screen and select "View details"
4. Select tab "Activity"